To apply gel nails, properly prepare your nails, then apply and cure thin coats of gel polish. This guide covers prep, curing, and pro tips for a long-lasting finish.
One common mistake to avoid when applying gel polish is applying excessively thick coats, which can lead to improper curing and peeling. Additionally, ensure you cap the free edge of each nail to prevent chipping.
For beginners, the order of gel nail application typically involves a base coat, two coats of color, and a top coat, with each layer cured individually. This systematic approach simplifies the process and yields optimal results.
Ready to master the art of gel nails and discover the precise order of application? Let’s dive into the correct steps for a flawless manicure with Profile The Chain of Salons.
How do you apply gel nails correctly?
To correctly apply gel nails, a meticulous process ensures a durable and polished finish. This systematic approach includes comprehensive nail preparation, precise gel application, and proper curing techniques.
Understanding the sequence and purpose of each step promotes successful and long-lasting results, laying the foundation for a flawless gel manicure.
What are the essential steps for preparing your nails for gel application?
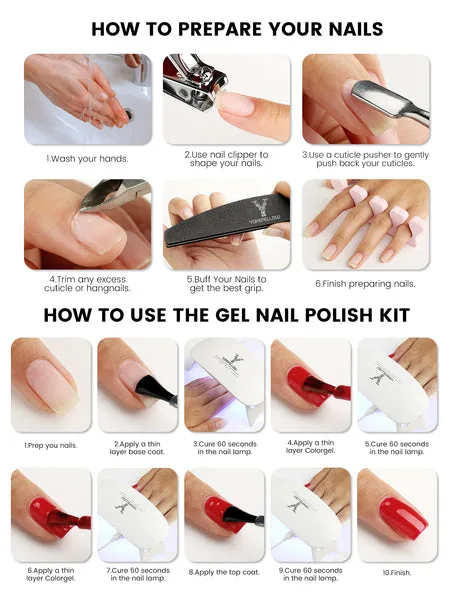
Preparing nails for gel application involves cleaning, shaping, cuticle care, and buffing. This ensures optimal adhesion and longevity of the gel polish. This meticulous preparation creates a smooth, clean surface, preventing common issues like lifting or chipping. Proper nail preparation is crucial for a successful gel manicure, setting the foundation for a flawless and durable finish. Each step plays a vital role in enhancing the gel’s adherence and overall appearance, contributing to extended wear time.
How do you properly cure gel nails under a UV/LED lamp?
To properly cure gel nails, use a UV/LED lamp, understanding specific curing times for different gel types and lamp wattages. This ensures each layer hardens, preventing chipping and peeling. Effective curing is crucial for durability and longevity, relying on the correct lamp, recommended exposure times, and avoiding common mistakes.
When curing gel nails, LED lamps typically cure most gels in 30 to 60 seconds, while traditional UV lamps require approximately 60 to 120 seconds. Different gel formulations, such as base coats, color coats, and top coats, often have specific curing instructions from the manufacturer that must be followed. Common mistakes during curing include under-curing, which leads to sticky, soft nails, and over-curing, which can cause brittleness or color distortion. Ensuring even light exposure across all nails also prevents soft spots and uneven hardening.
What is the correct order of gel nail application layers?
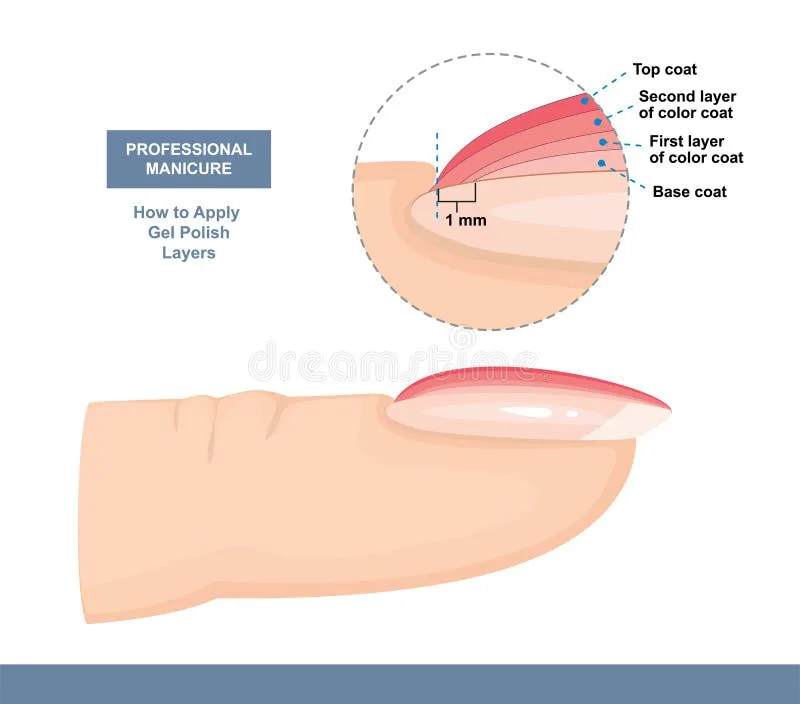
Apply gel nails in this order: base coat, two layers of color, then a top coat, curing each layer individually. This systematic layering ensures maximum adhesion and a long-lasting, chip-free finish. Adhering to this specific sequence is crucial for achieving professional-grade gel manicures. Each layer serves a distinct purpose in building the nail’s strength and enhancing its appearance.
What are common mistakes to avoid when applying gel polish?
Common mistakes in gel polish application include applying excessively thick coats and neglecting to cap the free edge. Avoiding these errors ensures a professional and long-lasting result. Recognizing and rectifying these frequent missteps is crucial for achieving a flawless gel manicure that maintains its integrity over time. Understanding these pitfalls improves application technique and prevents common issues like chipping and peeling.
How can you prevent common issues like chipping and lifting gel nails?
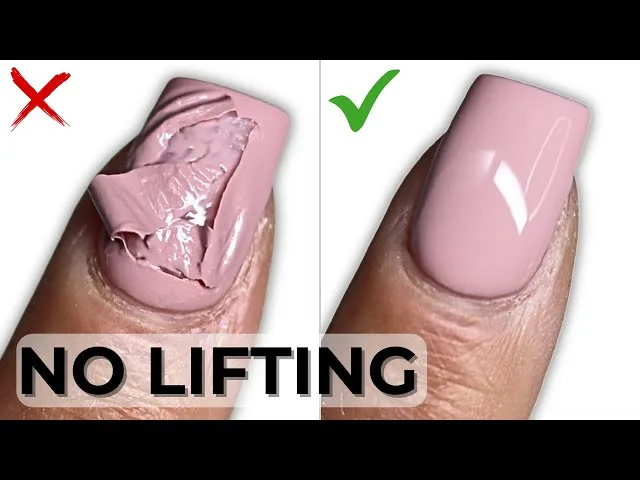
Prevent chipping and lifting of gel nails through meticulous preparation, precise application, and proper curing. This proactive approach addresses the root causes of gel manicure failures. Effective prevention focuses on enhancing adhesion and maintaining layer integrity. Adhering to best practices significantly extends the lifespan of a gel manicure. Key strategies include thorough nail cleaning and dehydration to remove oils and moisture, which interfere with gel bonding. Additionally, proper cuticle care prevents lifting near the nail bed. Applying thin, even coats of gel polish and capping the free edge seals the nail, while accurate curing times under a UV or LED lamp ensure complete hardening of each layer. Avoiding over-filing the natural nail also maintains its strength and promotes better gel adhesion.
Why is proper nail preparation crucial for long-lasting gel nails?
Proper nail preparation is crucial for long-lasting gel nails because it ensures optimal adhesion and prevents issues like lifting and chipping. Inadequate preparation compromises the durability and aesthetic of a gel manicure. This meticulous foundational work creates a pristine surface for gel application, extending wear time significantly. Without proper preparation, the gel polish adheres poorly, leading to premature breakdown. Consequences include gel lifting, chipping at the free edge, and a reduced overall lifespan. This poor adhesion often results in the need for early reapplication.
What are advanced techniques for a flawless gel nail finish?
Advanced techniques for flawless gel nails include precise shaping, accurate gel application, and detailed cuticle work. These specialized methods ensure salon-quality results. Mastering them achieves a smooth, even, and chip-resistant finish, distinguishing a professional gel manicure.
How do different gel nail formulations impact application and wear?
Different gel nail formulations significantly impact application and wear due to their unique chemical compositions and flexibility. These variations dictate how each type is applied, its durability, and removal process. Understanding these differences is crucial for selecting the appropriate gel for desired nail enhancements. Hard gels provide strength and are permanent, while soft gels offer flexibility and are soak-off.
What advanced tools and products can enhance gel nail application?
Advanced tools and products for enhanced gel nail application include specialized brushes, primers, and professional-grade gels. These items improve precision, adhesion, and durability, leading to superior results. Employing these specialized items elevates the quality of gel nail finishes. Using a high-quality primer creates a strong bond between the natural nail and gel, preventing lifting. Specialized brushes allow for intricate designs and precise gel placement, while professional-grade top coats provide enhanced shine and chip resistance.
Mastering Your Gel Manicure
Achieving a flawless and long-lasting gel manicure involves meticulous preparation, precise application of thin, even coats of gel polish (base, color, top), and proper curing under a UV or LED lamp.
Avoiding common mistakes like excessively thick layers and neglecting to cap the free edge of the nail ensures durability. Adhering to the correct order of application and understanding specific curing times for different gel formulations are crucial for preventing issues like chipping and lifting, ultimately leading to a professional-quality finish.